Converting a RAW file of a negative with Adobe ACR + Photoshop
We are starting with a RAW file of the negative and will use Adobe ACR (Adobe Camera Raw) and Photoshop to do the conversion.
- Load the RAW file of the negative into ACR
- Set the color space to ProProphoto
- Click in the border to set white balance
- Adjust the R, G, and B black and white points in the ACR Point Curve tool
- Turn sharpening way down (to prevent coarse film grain)
- Export from ACR to Photoshop
- Straighten and crop
- Adjust the Red, Green, and Blue black and white points.
- Invert the negative file with Ctrl-I and make it positive
- Correct the gamma (brightness)
- Fine tune the colors
- Convert to sRGB (if needed)
- The final version. Film vs. Digital
- Downloadable RAW file to practice on
Load the RAW file of the negative into ACR
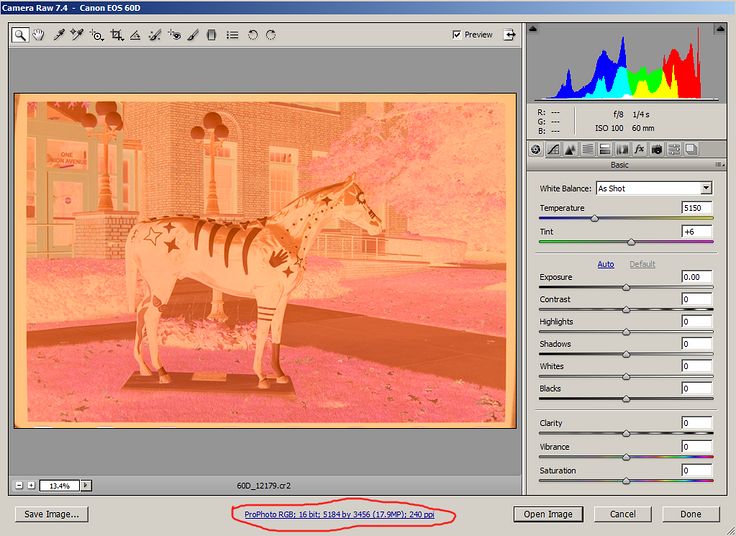
Load the .CR2 RAW file into ACR
Set the color space to ProProphoto
Click on the underlined text at the center bottom of the screen to get into ACR Workflow Options
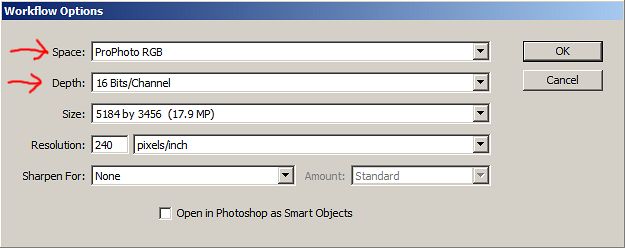
Change 'Space' to 'ProPhoto RGB'
Change 'Depth' to '16 Bits/Channel'
Negatives often have colors that are outside of sRGB. We save outselves a lot of trouble if we work in a large color space. We will be doing a lot of tonal manipulation so we should work in 16 bits.
Click in the border to set white balance
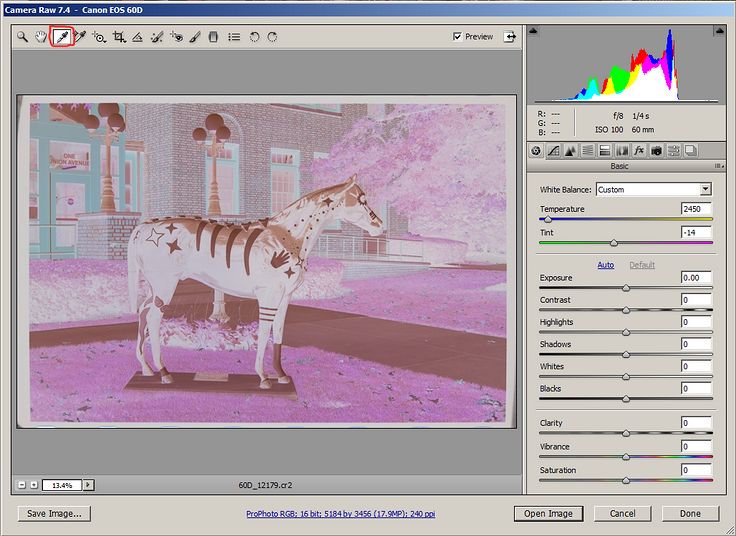
Click on the white balance icon. Then click somewhere in the frame outside of the image.
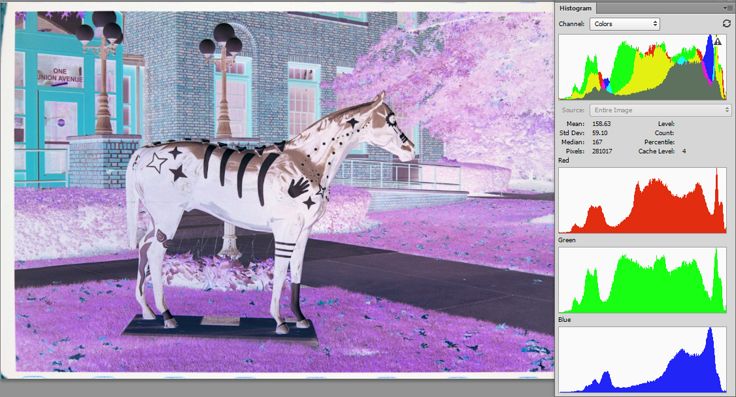
Adjust the R, G, and B black and white points in the ACR Point Curve tool
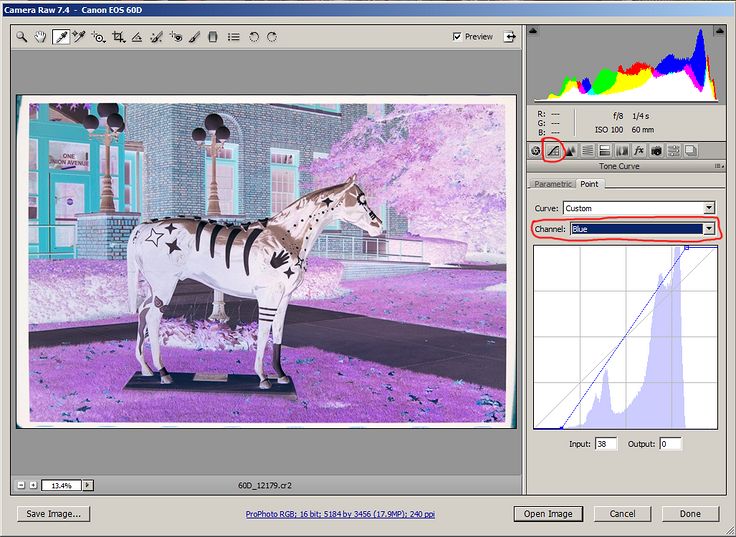
Change to the Curves panel
Adjust the black and white points for each of the R, G, and B curves.
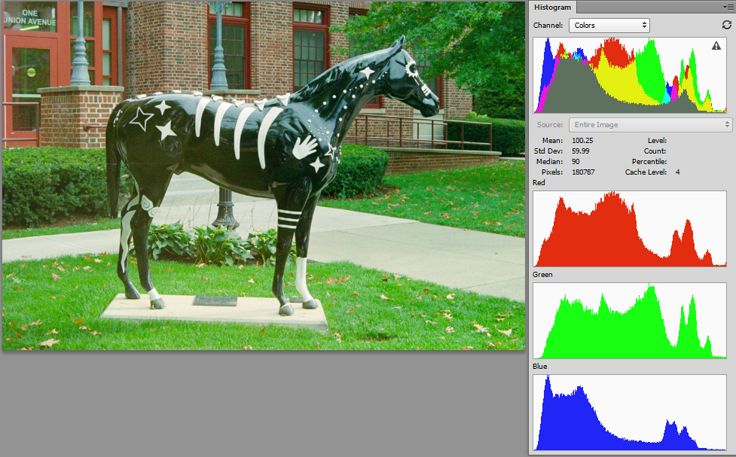
Notice how the histogram fills the space, with no gaps on either end. (Compared to the histogram in the previous screenshot.)
Turn sharpening way down (to prevent coarse film grain)
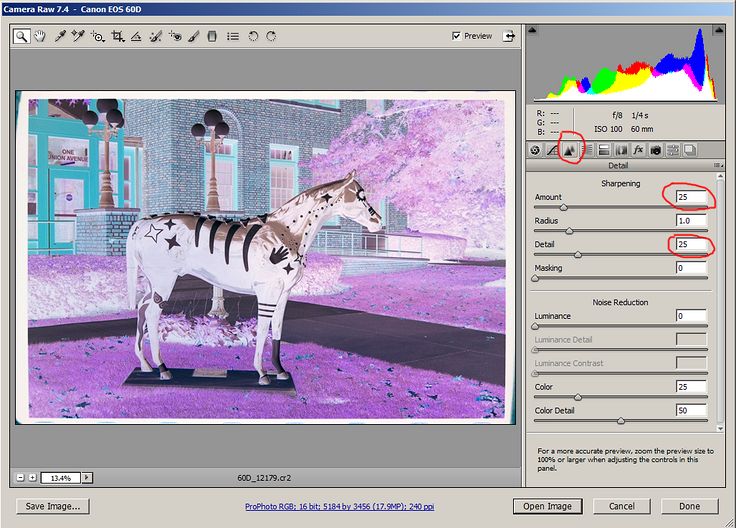
Change to the Detail panel and turn
Sharpening Amount and Detail down to 0
This might not be necessary in an image like this but it really makes a difference in an image that contains clear blue sky. If you leave Sharpening Amount and Detail at the default of 25%, the sky will be real grainy. Turning sharpening down here reduces the effect of grain. Sharpening a RAW file of a camera scanned negative mostly makes grain be coarser without doing much of anything to sharpen image detail. It is best to defer image sharpening as long as possible (because you can't unsharpen an image and it is difficult to remove coarse grain.)
Change Amount and Detail to 0%. Or maybe 5%. You can experiment with this but examine clear blue skies closely if you sharpen very much.
Export from ACR to Photoshop
When done adjusting in ACR, click on "Open Image" to convert the RAW file and export it to Photoshop.
Change the little triangle thingie on the status line so it shows "Document Profile". It should be showing ") if you followed my recommendations.
if you followed my recommendations.
It should look something like this:
Still negative, but white balanced
Straighten and crop
(Not shown.) Straighten and crop the image. Before you do the next steps you need to remove the borders so all you have is image.
Adjust the Red, Green, and Blue black and white points.
Open Levels (Ctrl-L)
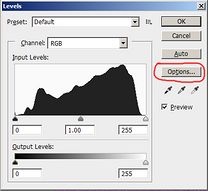
Open Levels and Click
the Options button
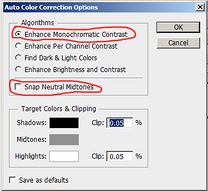
Enhance Monochromatic Contrast
is checked
Snap Neutral Midtones
is not checked
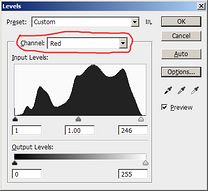
Check each Red, Green, and
Blue channel and verify that the
black and white points are snugged
against the histogram.
And that the middle slider is 1.00
Invert the negative file with Ctrl-I and make it positive
Now we need to invert the file by using Ctrl-I on the keyboard. The image should change from negative to positive. The colors might look wonky at this point.
Inverted into positive
The negative has been inverted.
Correct the gamma (brightness)
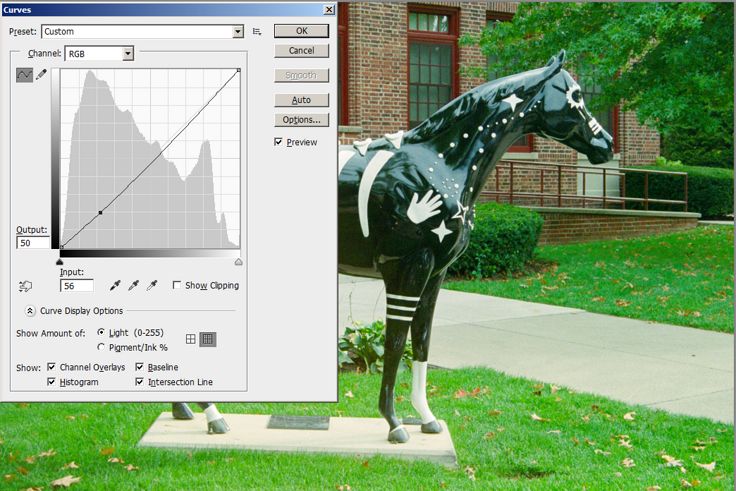
Correcting in Levels
Open the Curves dialog (Crtl-M) Adjust gamma by dragging the center of the RGB curve down. This should darken the image. Adjust the RGB curve until it is the desired brightness.
(This particular image does not need much adjustment, but many converted negatives need a lot of gamma correction. This is the time to adjust gamma; after cropping and adjusting the RGB black/white points and before doing any other color correction.) Click OK to exit Curves
Fine tune the colors

Correcting in Curves
Open Curves (Ctrl-M). Click on the "Options" button. Try the different algorithms to see which one looks best. For each algorithm, click "Snap Neutral Midtones" on and off. When you find the option that looks best, click "OK." You are still in Curves. Carefully examine the image.
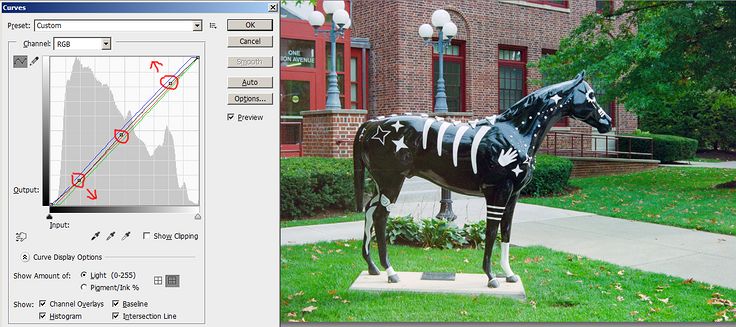
Adding contrast with an S-curve
I felt that the image needed more contrast so I made an S-curve by adding three points to the RGB curve and pulling the top one up and the bottom one down.
If you feel that it still needs correcting, open each of the R, G, and B curves and make any other changes you feel it needs. Do the whites have a pinkish cast? Then add a point near the top of the Red curve and drag it down a bit. Do the shadows have a blueish cast? Open the Blue curve, add a point near the bottom and drag it down. etc. Adjust the RGB curve to fine tune brightness. If you feel that the image needs more (or less) contrast, add points near the top and bottom. To increase contrast, pull the top point upwards and pull the bottom point down. When you are happy, click "OK" to get out of Curves.
After this use any other PS tool that will help. Shadows/Highlights, Hue/Saturation, etc.
Convert to sRGB (if needed)
If you were working in the ProPhoto color space, you probably need to convert to sRGB (at least for displaying on the web/Facebook, etc.) and save a copy as an 8 bit JPG (Image/Mode/8 bits per channel before saving as JPEG.) If you are using a full color managed workflow then you also might want to keep a copy in ProPhoto (because ProPhoto is a much larger color space and contains more saturated colors. Once you convert to sRGB, you can't get the saturated colors back again. If you keep a copy in ProPhoto, keep it in 16 bit mode and save as TIFF.)
The final version. Film vs. Digital
For this horse picture, I compared against an image of the same scene that was taken with an EOS-M. Some of the colors were more saturated in the converted negative, so I used the PS Hue/Saturation tool to reduce the saturation of the greens (and maybe other colors--Photoshop crashed when I was almost done before I wrote down the exact changes.) I then cropped the image to match the EOS-M image as close as possible. (Both images were taken hand held. I adjusted the brightness a bit with the RGB curve in the curves took. Yielding:
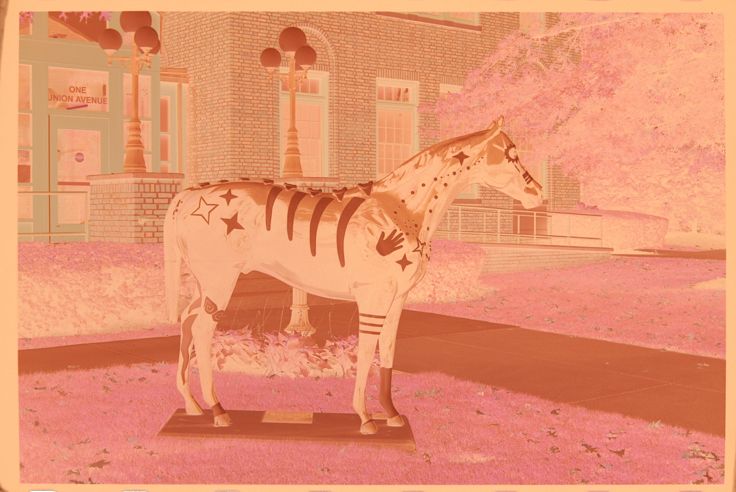
Original Kodak 400 negative.
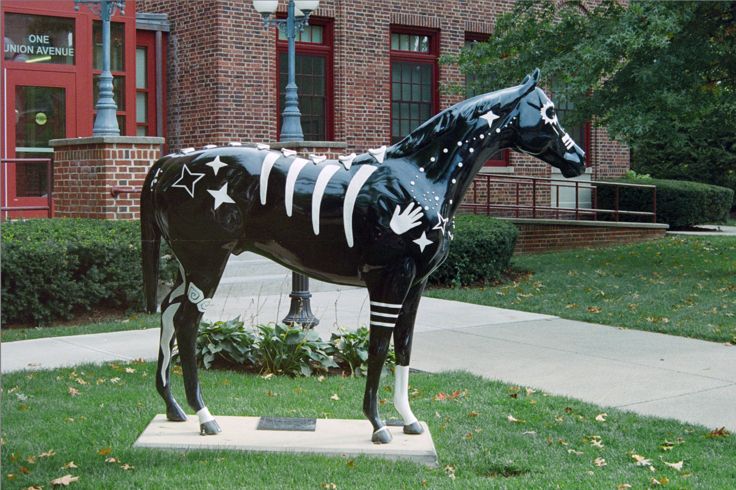
Final version of the color corrected Kodak 400 negative.
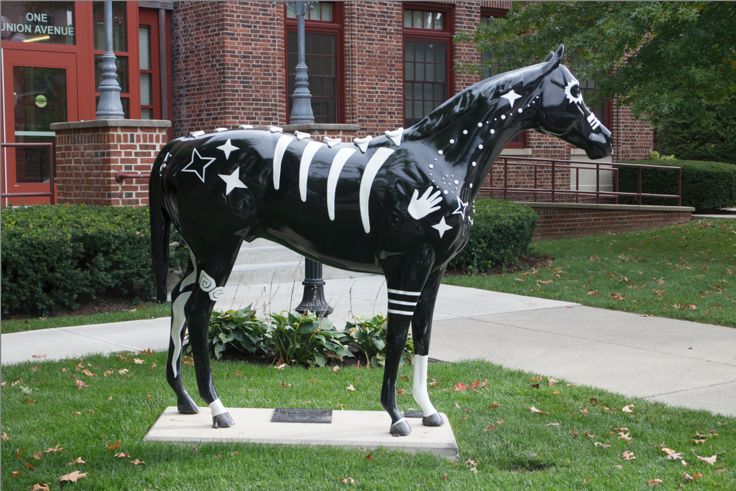
The same scene taken with a Canon EOS-M
The top image is the final version of the color corrected frame of Kodak 400 negative. The bottom image was taken by a Canon EOS-M mirrorless at the same time that the film image was taken. The framing doesn't quite match because these were hand held. And the colors don't match exactly, because these are two very different processes. And because "calibration" was done in the final step of hand adjusting R, G, and B curves.
Downloadable RAW file to practice on
Actual Canon 60D Raw file of the camera scanned negative so you can practice on it. About 33 megs.
Questions? Write to camerascanning@frogymandias.org