Using a digital camera to 'scan' a negative
This is the first part of the process of using a digital camera to "scan" transparancies, such as slides and negatives.
What kind of camera is suitable for camera scanning?
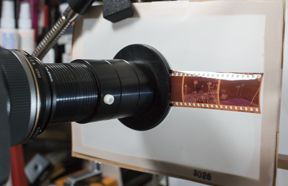
Extend-a-Slide and negative
Rosco #3026 diffusing filter in
front of the Extend-a-Slide
I have had the best luck using a DSLR camera. I use a macro lens, because macro lenses are designed to focus on a flat field. Normal camera lenses often have a curved plane of focus which isn't good when you are trying to focus on a flat piece of film. A frame of 35mm film is small. Normal camera lenses usually can't fill the frame when pointed at a frame of 35mm film. Macro lenses are designed to get real close to things.
I use a Canon 60D DSLR and a Canon 60mm macro lens. I use a Photosolve Extend-a-Slide to hold the slide or negative in front of the macro lens. I use a customized version of the Extend-a-Slide negative carrier. (More on this below.) Liveview helps, but isn't absolutly necessary.
I use liveview mode (image displays on the LCD screen). I magnify 10x and use manual focus and focus on film grain. In order to alleviate out of focus areas caused by excessive film curl, I move the liveview focus point to the portion of the image that is most important. i.e., a face. I use manual mode on the camera and set the aperture to f/8 (f/11 on a full frame camera.) I use the camera's lowest ISO and use a remote shutter release. I use RAW mode. I strongly recommend using RAW mode and work in 16 bit mode because color correcting negatives will require a lot of tonal manipulation. If you start with an 8-bit JPEG, your image may be posterized after you do the color corrections.
What I use for light
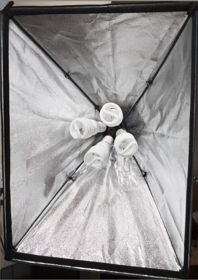
CFLs in softbox
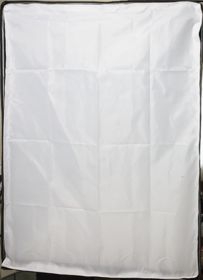
Diffusing panel on front of softbox
You need a light source that is at least 5000K. Meaning daylight color balance. If you use a light source that is warmer (such at 2700k "soft white" bulbs) the light won't have enough blue to offset the negative's orange mask.
I use four daylight balanced CFLs that have a CRI (Color Rendering Index) of 93, mounted in a softbox. I use this 4-way adapter to mount the CFLs. I add two stops of additional diffusion by suspending two layers of Rosco #3026 diffusion filter in front of the film.
Make sure that the CFLs are daylight balanced and have a CRI rating that is over 90. If the CFL package doesn't say anything about CRI, it probably is too low to be useful.
If you want to use "warm" light, such as tungsten bulbs, you can raise the effective color tempreture by using a layer of Rosco #3202 (blue) tungsten-to-daylight filter in between the bulbs and the negative.
Tips on handling negatives and useful supplies

Logen slide sorter
Hold the negatives by the edges. You really don't want to get fingerprints on the image portion of a negative! If you are pathologically clumsy, wear cotton gloves. Wash your hands real good before handling negatives to remove as much skin oil as possible.
It is a good idea to have Pec-12 Emulsion Cleaner and Pec*Pad Photowipes on hand. Just in case somebody clumsy sneaks in and gets fingerprints on your negatives. A Rocket Blower is useful to blow dust off of negatives. A Kinetronics anti-static brush can remove dust that the Rocket blower won't remove.
Canned air can be useful to blow dust off your work area (and the negative carrier) But be careful using canned air on negatives because sometimes canned air spews semi-caustic fluid that probably isn't good to get on your negatives.

Negative handling wand cut
from index card stock
A Logan slide sorter is handy when examining negatives. A wand is useful for lifting up one end of a negative so you don't risk touching the negative with your bare fingertips. I cut wands from blank index card stock. I mark both sides of one end so I know which end to grab with my thumb and finger (so I don't get finger oil on the end that touches the negative.)
If you want to examine a frame of a negative closely a quality 8x loupe will let you see detail. A quality loupe is a bit pricey, but a cheap magnifying glass will not provide enough magnification to let you evaluate detail. (If you get the Peak 8x loupe I linked to, the "puncher and holder" is really the slide/negative carrier. The "puncher" part is a punch so you can punch an actual notch in the negative; presumably to indicate which frames to scan. I guess. I use it as a negative (and slide) carrier and have never used the punch part.)
How to set up the camera
Set the camera's white balance to "Daylight." Set the camera to manual exposure. Set aperture to f/8 (f/11 on a full frame camera), and ISO to 100. Adjust the shutter speed to set the exposure to barely overexpose the red channel. (Shooting RAW gives a bit of latitiude with exposure.) Use a remote shutter release.
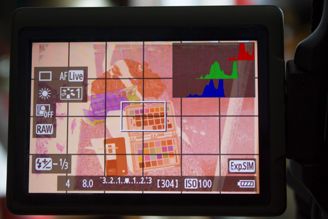
Adjust exposure to just barely overexpose the red channel
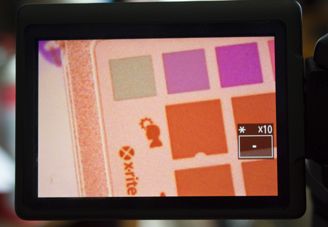
Zoom to 10x and manually focus on the film grain
Move the focus point to the most important part of the image. In case film curl makes it impossible to focus on the entire image, if you focus on the most important part (like a face), maybe you won't notice the part that is out of focus. (I haven't had many problems with film curl causing focus problems. Usually only with film that is so curled that it is a real fight to thread and advance from frame to frame.)
If you can see grain on the negative, it is best to set your liveview to 10x and focus on the grain. If the grain is to fine to focus on, then set the liveview to 5x and focus on image detail. (But if the image is in focus and has lots of fine detail, such as tree branches, it might work better to use 5x and focus on image detail.)
I can usually thread negatives in from the side so I don't need to remove the negative carrier from the Extend-a-Slide.
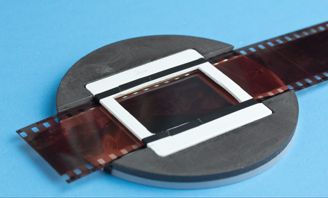
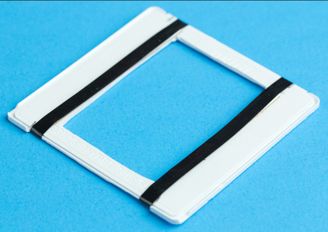
Customized negative carrier
You can use the standard Photosolve Xtend-a-Slide negative carrier. But after using it for a while I wanted to make some changes. I wanted the diffusing to be away from the film (and not be the white disk) and I wanted tracks in the sprocket hole area so only the sprocket hole portion of the film was making contact with the negative carrier.
I wrote the owner of Photosolve and we worked out a compromise: He sold me a plastic disk with a rectangular hole slightly larger than the negative frame and put thicker magnets on the disk to allow room for me to make my own spricket hole tracks.
I also wanted the frame enlarged so that a portion of the image border (including part of the sprocket hole) was exposed (so none of the image was masked off and so I could have unexposed film in the sprocket area to do a white balance in my RAW converter.) This is what I did after I received the modified parts:
Customized negative carrier
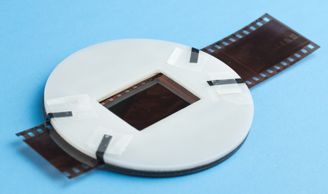
Customized negative carrier
I wanted the rectangular hole cut in the white disk diffuser because I wanted the diffuser (two layers of Rosco #3026 filter) to be well away from the camera's plane of focus. (And not be an area that will trap dust and cat hair.) The plane of focus is thin so the Rosco filter can be within 1/2 inch of the front of the negative carrier.
The square white portion is a standard Pakon Slide Mount (that you'd use if you were remounting slides.) You can get your own supply of them so you can modify them with a file, as needed. Or have different thicknesses of Art Tape. (Excessively curled negatives might need a thicker layer of Art Tape to smooth out the curl.)
When modifying parts that contact the negative, double and triple check with your fingers to make sure that you haven't created any burrs that can scratch the negative.
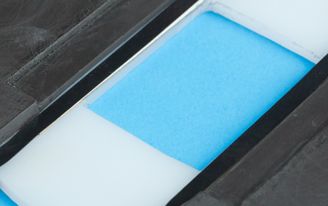
Note shim stock under Art Tape
The shim keeps the film tighter to reduce curl
The hole was enlarged so the negative frame
and sprocket holes aren't covered up
I used several layers of Art tape on each piece. To build up the thickness. I originally expected that the Art tape would need replacing, but I am still on the original Art tape. I haven't had to replace it yet.
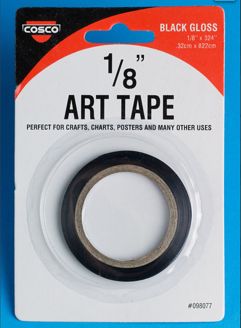
Art Tape (used as film guide)
So that image portion of the film is raised
from the carrier
Shim stock that goes under the Art Tape
This material is just the right thickness
I got the Art Tape at Staples. You can probably figure out where to get shim stock.
Questions? Write to camerascanning@frogymandias.org