Camera Scanning your Negatives
An illustrated guide.
This is how I use camera scanning to convert negatives into color corrected images.
First use a camera to digitize the negative
Using a Canon 60D + 60mm macro lens + Photosolve Extend-a-Slide to 'camera scan' negatives.
Then we need to convert and color correct the negative
Converting: method 1. dcraw and Photoshop
Use dcraw to make a linear TIFF and use PhotoShop to convert it.
Converting: method 2. Using Canon DPP and Photoshop
Converting the RAW file with Canon DPP Convert the RAW file into 16 bit linear TIFF file using Canon DPP.
Converting the linear TIFF file with Adobe Photoshop Convert the 16 bit linear TIFF file into the final color corrected image.
Actual Canon 60D Raw file of the camera scanned negative so you can practice on it. About 33 megs.
Converting: method 3. Using Adobe ACR and Photoshop
Step-by-step instructions on using Adobe ACR and Photoshop to convert a negative.
Actual Canon 60D Raw file of the camera scanned negative so you can practice on it. About 33 megs.
Converting: method 5. Use the ColorPerfect Photoshop plugin
The ColorPerfect Photoshop plugin.
Converting: method 6. Using Adobe ACR, Photoshop, and Kodak Digital ROC
Quick docs on using Kodak Digital ROC with Adobe ACR and Photoshop to convert negatives.
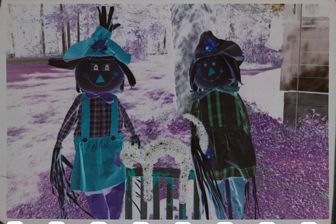
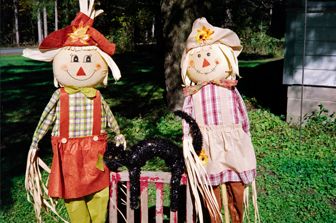
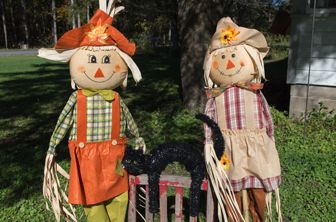
Two Scarecrows (an excercise)
No step-by-step instructions, but I used roughly the same procedure as above. About the only difference is I needed to twist the curves slightly in the final Curves step so that the converted negative image better matched the image taken directly with an EOS-M.

RAW file of Fuji 200 negative
White balanced linear TIFF saved from DPP
Converted Fuji 200 image
Same scene taken on an EOS-M Mirrorless camera
Actual Canon 60D Raw file of the camera scanned negative so you can practice on it. About 38 megs.
Comparison of different methods of scanning
Comparison of different methods of scanning
Questions? Write to camerascanning@frogymandias.org